PiezoBarrel® Instructions

Using your PiezoBarrel Pickup


Connecting your PiezoBarrel pickup

Please read all instructions before connecting your pickup

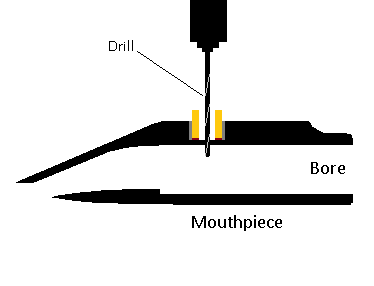
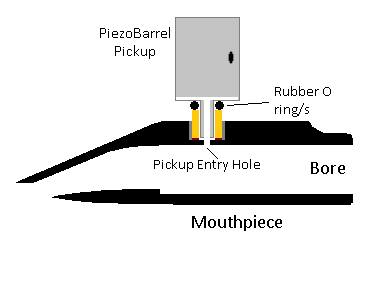
Screw-in Pickups have a standard 6mm metric thread on the bottom that screws into a brass thread in the supplied mouthpiece or clarinet barrel. The pickup should be mounted in a position where moisture will not flow into the pickup (at the top of the instrument). A silver stainless steel or brass screw is supplied to block the hole in the mouthpiece or clarinet barrel after the pickup has been removed to allow the instrument to be played when the pickup is not being used.

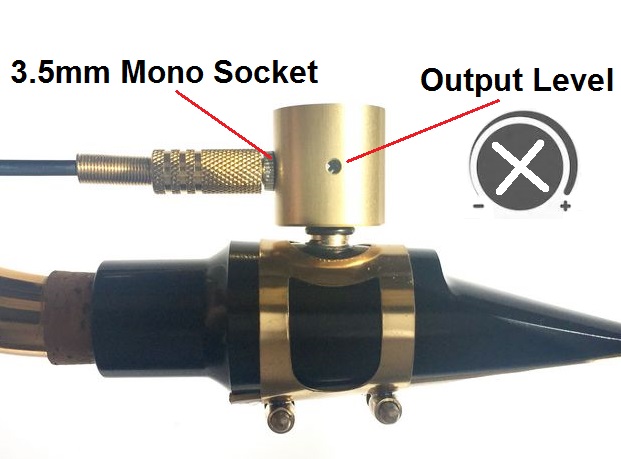
PiezoBarrel pickups are supplied with a black shielded cable that has a mono 3.5mm (1/8 inch) plug on one end and a 6.35mm (1/4 inch). The 3.5mm plug fits into the 3.5mm socket in the pickup. The 6.35mm plug can be plugged into sound equipment such as a guitar amplifier, mixer (line in, instrument in or unbalanced in), guitar effect pedal input socket or vocal effects pedal unbalanced or line in socket.

The PiezoBarrel output is line level and you may want to turn the output level on the down (turn the adjusting screw anti-clockwise) before connecting to microphone inputs to avoid overloading preamplifier circuits

Before connecting the pickup to sound equipment you should turn volume controls down to zero on the sound equipment. For effect pedals, the pedal should be turned on after the pickup has been attached (this is often achieved by disconnecting the output lead on the pedal).

PiezoBarrel pickups do not require a preamplifier. The output of the pickup should be set to a low level for equipment that is designed for microphone input levels as these devices often include a preamplifier.

The pickup should be removed from the instrument, dried and stored when not in use.

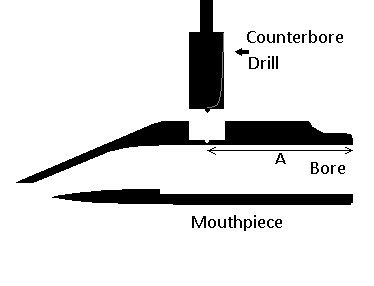
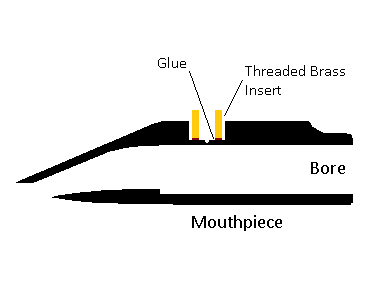
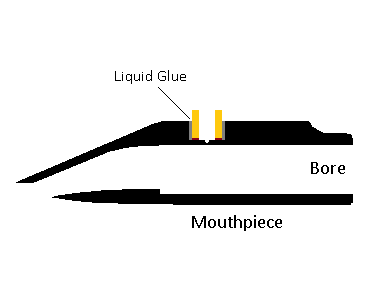
Information on fitting a brass ferrule to your own barrel, mouthpiece or other instrument is covered below.


Do it yourself instructions

Fitting a brass thread

If you are fitting a pickup to your own mouthpiece or clarinet barrel or to another instrument, or if you are an instrument technician doing the work for someone else then these instructions may be of interest to you.


Step by step guide for Sax or Bass Clarinet Mouthpiece:
Step 1

Firstly, you will need to drill a flat bottomed hole in the sax mouthpiece (or clarinet barrel). The best way to do this is with a Drill Press and a Counterbore (a 3/8 inch counterbore is ideal). The counterbore is the tool used to make concealed screws in furniture.

The counterbore has a pilot drill down the middle held in place with a grub screw. The pilot drill should be moved up so only the very tip of the drill pokes out so the hole doesn't go all the way through (if you can't do this, then just ensure the hole doesn't go right through the mouthpiece and into the other side of the bore).

The drilling should be done with a drill press to ensure the hole is accurately cut perpendicular, and central to the bore. Check the position to ensure that the ligature will still fit after the pickup adapter has been fitted and the hole in the bore will be far enough forward to not be blocked by the saxophone neck. For bass clarinet, you will only need to ensure the ligature will still fit.


Step 2

The bottom of the brass pickup adapter (also called an insert) is lightly coated with glue (I use jewelery glue but the type doesn't matter as long as it seals all the way around the adapter) and glued to the bottom of the hole. This is just to hold the brass in place while the rest of the glue is applied.

Note that the counterbore hole is larger than the brass insert. This gap is to allow the glue or resin to be injected around the brass adapter to hold it firmly and make an airtight seal.


Step 3

A glue is poured or injected around the brass insert and allowed to dry. The glue can be a two part resin such as Araldite or any glue that will set to make a solid joint. I use a two part plastic resin but a variety of different products can be used.

As a suggestion, you can buy a cheap plastic syringe and a blunt needle from a chemist store and use this to inject the glue without making a mess.


Step 4

After the glue has dried or set, the next step is to make a hole into the bore to allow the sound to get to the pickup. I usually make the size of the hole quite small 2.5mm or 1/8 inch. The hole can be larger up to the size of the inside of the thread but a large hole may affect the sound unless the pickup thread goes all the way to the outside of the bore.


Step 5

The pickup can then be fitted by screwing in the pickup and checking to make sure it stops before the bottom of the pickup butts against the bottom of the bore. The O ring is designed to make an airtight seal with the pickup. If there is a gap between the O ring and the brass thread you may get air leaks. I supply spare O rings and usually a couple of different sizes so you can use more than one or a thicker O ring to get a good seal.


Step 6

The ligature generally needs to be a metal ligatuture as these are designed with a hole in the top to suit a pickup.


Video - Fitting a brass thread to a clarinet barrel:
Before you begin

These instructions are for fitting a push-in brass insert into a clarinet barrel

The video shows drilling a plastic barrel. For a wooden barrel, you will need to ensure both the outside and the inside of the barrel do not chip during the drilling process as ebony/grenadilla can be very brittle.

The drilling should be done with a drill press to ensure the hole is accurately cut perpendicular, and central to the bore. Barrels sold by PiezoBarrel with a brass thread have not been fitted using this method.


Video - Fitting a brass thread to a clarinet barrel:
Alternative method

This is an old video that shows how the brass fittings were built in to clarinet barrels in the PiezoBarrel factory in the past. The current method uses the same 3/8 inch counterbore to make a flat bottomed hole and a Type C brass insert is used in place of the brass hex nut and a small hole (2.5mm diameter) is drilled through into the bore. The casting resin is injected around the outside of the adapter using a syringe with a 22,23 or 24 guage blunt dispensing needle. These are used by hobbyists for injecting glue and are widely available (and cheap). Chemists/drug stores can also supply syringes and needles and sharp needles work as well as blunt ones - you just have to be more careful handling them.